Roasted Pork Belly
Now I know that this one has been on the request list for a while now. It's also one of my absolute favourites. I love pork full stop. But, roasted pork belly with crunchy crackling is just the bees knees in my world. I also find it's a huge crowd pleaser...I don't know many people that wouldn't be excited to tuck into some. That, however, may just be a reflection of the people I like to surround myself with, but I'm going with it! I have dished this up over the past few years a number of times. It can be a dish for Christmas Day as part of a larger "spread", for “just us” on a decadent Sunday or for when good friends come for dinner.
There are many ways to cook pork belly. You can braise it Asian style with a gorgeous spiced stock/syrup and serve it with rice and steamed greens, you can cook it long and slow and then cook again quickly in hot oil to make it crispy and you can sous vide it (cook in a sealed bag) for super tenderness and then quickly crisp the skin. Recently I saw Adam Liaw "stir fry" pieces of it quickly, with the skin removed, in some lovely Terriyaki sauce, which looked delicious too.
This recipe is a roasted pork belly recipe and in this instance I'm serving it with a modern take on roast veggies by creating a warm veggie salad. You can do whatever you like when it comes to the sides. To be honest, you could just laden up my plate with the juicy, tender meat and the crispy crackling and I'd be happy....but that's just me.
When we are talking CombiSteam cooking and pork cracking a little bit of moisture is a good thing, but we don’t want too much. We always want to start off with our temperature up nice and high for around 30 minutes to start the crackling process. With pork belly you then want to go low and slow for a long time to help break down all that fat and make it nice and tender. You can use your Combination Steam function with your Steam set to low or in some ovens you may have a “humid” or “moist” Fan Forced setting which won’t necessarily use Steam but will create humidity by keeping the food’s moisture inside the oven space. I find that’s pretty good too. You can really experiment and see what result you like best. You can stick to the recipe generally but play around with the function you choose and the amount of steam you use (if you oven needs to be manually adjusted for Steam).
It’s great to start this recipe the day before and prepare the pork by taking it out of any packaging, scoring, salting and leaving the fridge overnight. This will help to draw out the moisture from the skin which will give you a crispier crackling - and who doesn’t want that?

Perfect Roasted Pork Belly (serves 6)
large piece of good quality pork belly* (mine was around 2kg)
2 heaped tbs seeded mustard
3 sprigs thyme (leave picked)
1 tbs apple cider or white wine vinegar
1 tbs brown sugar
1 tbs olive oil
s&p
optional for roast veg salad:
3 small beetroot (whole, unpeeled, roots removed & scrubbed clean)
3 medium parsnip (peeled and cut in half lengthways)
3 medium carrots (peeled and cut in half lengthways)
1 fennel bulb (cut into large wedges/chunks - think equivalent to your parsnips & carrots)
150g baby spinach (optional)
1 tbs dijon mustard
1 tbs apple cider or white wine vinegar
3 tbs extra virgin olive oil
s&p
hummus to serve if desired
Method:
Remove the pork from the packaging/plastic bag and lay on a plate. Pat the skin dry with some paper towel.
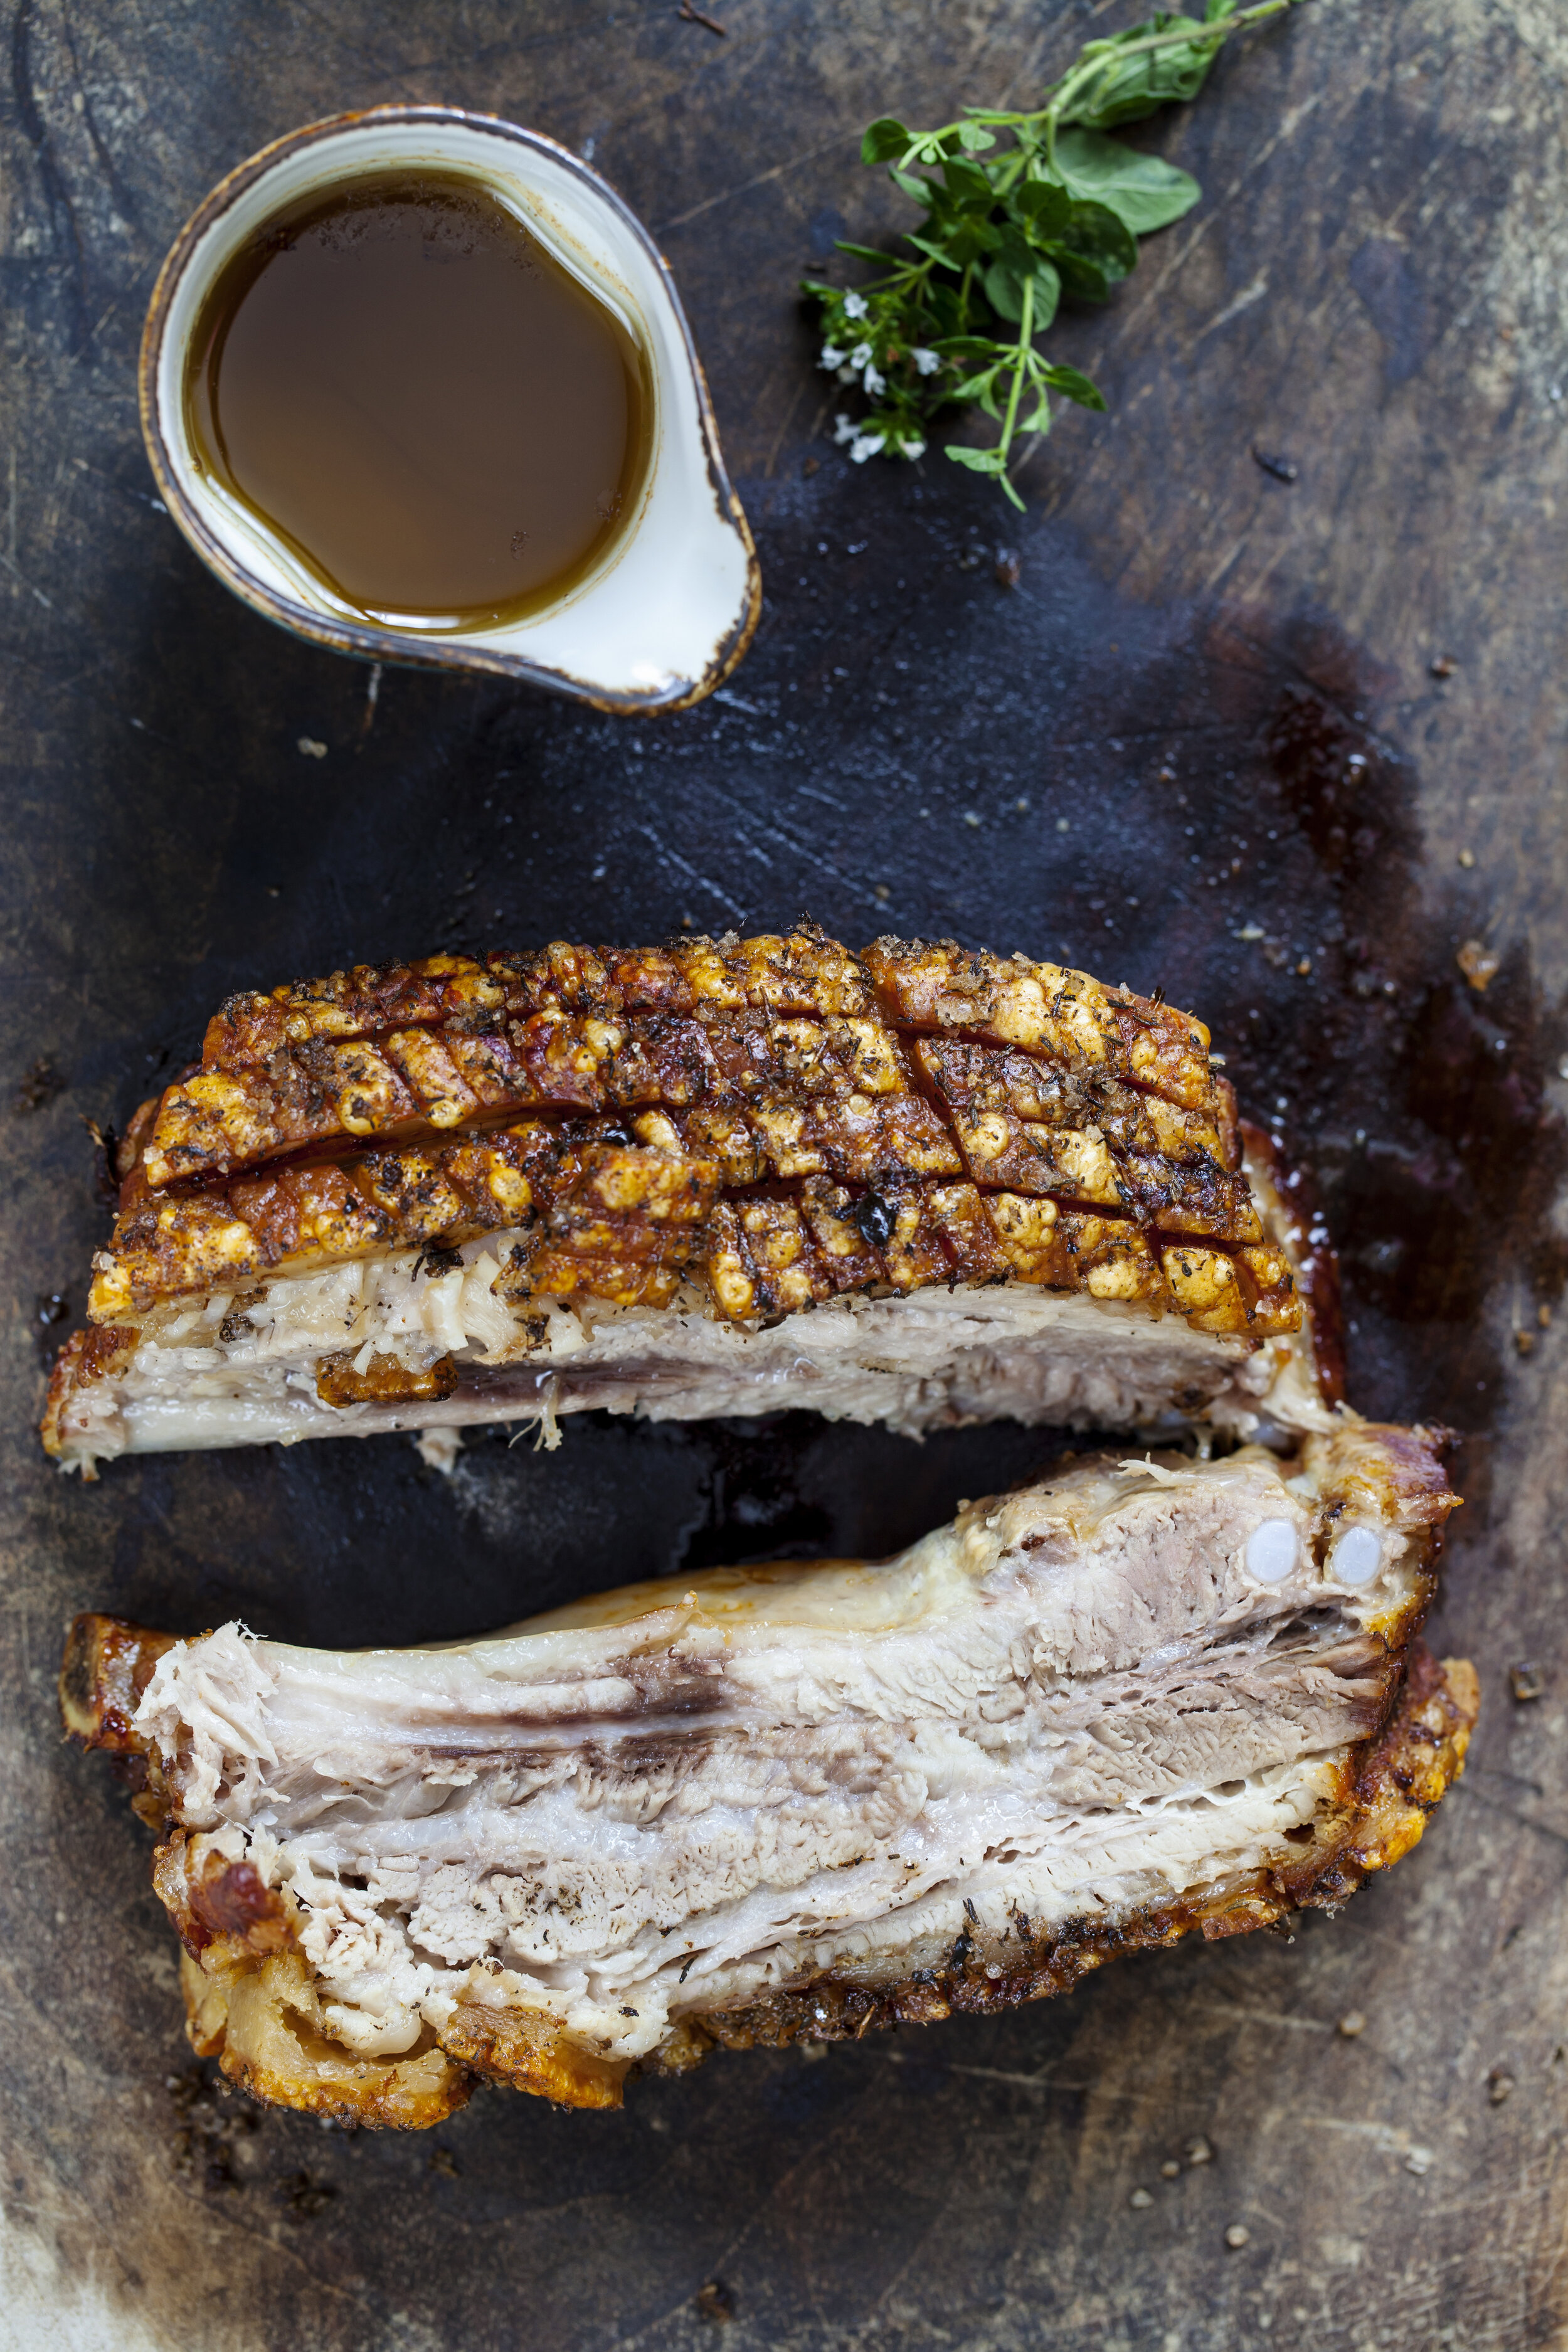
Use a very sharp knife* to slice the skin diagonally across one way and then the other to form a criss cross patten. Try not to cut into the meat (only the skin) and make sure you go right down through the edges on the sides so the fat can run out. Sprinkle the skin with a very generous amount of salt (about 1 ½ tbs) and place into the fridge, skin side up, for at least a few hours (overnight if possible).
Remove the pork from the fridge 1 hour before cooking and set aside to bring to room temp.
Place a rack/shelf into the bottom level of your CombiSteam.
Select Combination Steam. Set the temperature to 230°C or the highest you have. For variable steam set to 20%. (In V-ZUG/Wolf - I recommend Hot Air/Convection Humid) Allow to pre-heat.
Combine the remaining pork ingredients in a small bowl and add a good couple of pinches of S&P. Mix well to combine and create a paste. (You can use a mortar and pestle if you have one) Turn the pork skin side down and rub the paste all over the meat, covering the underneath and the sides. Don't put it onto the skin. Place the pork onto a rack/shelf.
Line a large baking dish with baking paper and place onto the bottom rack in your preheated oven. Slide the pork into the oven so that it is over the top of the baking dish allowing the fat to drop down into the dish.
Cook for 30 minutes. Reduce the temperature to 140°C and continue to cook for a further 2.5 hours.
Carefully open the oven and remove the baking tray from under the pork. Pour almost all of the fat and juices into a heatproof jug. Leave around 2 tbs of the liquid in the pan. Add the prepared veg and toss to coat. Return the dish to oven under the pork. Cook for 35 minutes or until veggies are tender.
Meanwhile combine the veggie dressing ingredients (mustard, olive oil and vinegar) in a jar or small dish until creamy and emulsified. Set aside.
When veggies are tender increase the temperature to 200°C. Allow to cook for a further 5-10 minutes or until everything is browned and slightly sticky and the pork crackle is popped.*
Remove the pork and set aside to rest, uncovered, on a clean chopping board.
Allow the veggies to cool slightly then toss with the dressing and the baby spinach (if using).
Slice the rested pork and serve with the warm salad and hummus if using.
Tips:
*buying pork from a butcher is your best bet...ensure you get a piece that has a good mixture of meat and fat and is not too thin.
*I use a stanley knife to score my pork - buy one and keep it in your kitchen draw for this job but remember not to use it for anything else!
*if the pork is not really tender simply continue to cook until it is....we are not worried about over cooking here as the pork belly is a very moist cut and we are using our moist setting to protect against drying out
*if you find your crackle is not completely crackled in step 11, you can increase the temp back to 230°C, after removing the veggies and give it another zap for a few minutes or until you're happy
*when you remove the fat & juices you can also skim off the fat and the pop the lovely juices into a small saucepan and add a big splash of white wine or stock and let it bubble on the stove to reduce before serving it with the meat as a "jus".
I have made this many many times and usually I cook more by look and feel rather than following recipes and timings. Remember to use the procedure as a guide and also use your own judgement to adjust it to your liking.
Enjoy!
Yours in the kitchen,
The CSQ. x